Wednesday, February 18, 2015

The Pekin Bantam invasion of 2014-15


There have always been chickens in my life - as early as I can remember we had a coop in the back yard and we had chickens on and off throughout my childhood.

I can't remember a breed stealing my heart though. In fact, if you asked me what kinds of chickens I've owned I can tell you that I remember having white ones as a kid and that's about it! More recently I ordered Rhode Island Red's from a breeder and instead of getting only Rhode Island's I was supplied a mix - it turned out to be a good thing as the Buffs are in my opinion a nicer chicken and much hardier. I really like the Barred Rocks although my biggest bully is one... The roo that my mom still has is a gentle giant and looks after his ladies like gold!

And that brings me up to today. Quite by accident I decided to add some Pekin Bantams (incidentally the only true bantam breed - meaning they have no full size variety) to my latest order. I actually thought I was getting polish bantams until they arrived and were quite clearly not...  Oh boy I didn't realise what a treat I was in for!!! They arrived much older than the other chicks and the breeder suggested I take two pairs as they're not hardy and she was worried I might lose one in transit (they travelled about 600km by courier service)

These little bundles of feathers are the most interactive chickens we've had by a long way. They're naturally tame and not even the slightest bit scared of the boxer which meant that the other chicks were also safe as the bantams took it upon themselves to teach said boxer a thing or two about confident chickens... Initially I was really nervous as the boxer is the queen of the house and was trained to chase ducks and geese off the jetty (they make more poop that is reasonable and the patient husband banned them...) but these little guys jumped all over her when I turned my back on afternoon and I haven't had to worry about interactions since :)

We just skipped town for a week for a river trip and left the farmyard in the capable hands of an old friend who would have chickens if his space and schedule allowed. We came home to three pekin bantam chicks - the cutest little bundles of fluff you can imagine (think feathered feet - still all fluff). 4 hatched while we were away but we lost one to one of the roo's before anyone realised they'd hatched :(

Fast forward to this morning and we've got two more chicks (the eggs were set quite far apart so I'm anticipating a couple more to come - the hens are still sitting on another 5 or so eggs)

Since we had to remove the chicks from the hens because of the set times it's given us a ton of time to play with the babies... They grow so fast and are providing so much entertainment! I decided to try and get some photos before they start to move too fast. I'm pretty chuffed with the results :)


Wednesday, December 17, 2014

Christmas Star Shortbread Cookies

Just a quick little stop-in to share the recipe I'm currently using for super cute and oh so drool-worthy Christmas cookies :) 

It's really just a basic shortbread cookie but the beauty is that it doesn't crumble like regular shortbread, it rolls out and cuts like a dream and really just melts in your mouth!

I'm not sure I've ever made a single batch of anything in my life (thank you, Ouma!!) save cakes which you're not really supposed to double up on but I've tried most of my recipes doubled up anyway!


Feel free to halve the quantities but it feels so good to share treats (with family, neighbours, colleagues) and it's no extra work!


Melt Away Shortbread

600ml Cake Flour (I only use unbleached stoneground)
50ml Corn Flour (this is a little more tricky as I haven't found an organic option in SA)
200ml Icing Sugar
250g Soft Butter
5ml Vanilla Essence

Preheat oven to 150 degrees CELCIUS. Sift dry ingredients into a bowl. Rub in butter until you have a fine crumbly consistency Plop dry ingredients into a large mixing bowl. Use your electric beater to mix (this achieves the same as sifting with zero effort and one less dirty item!!) Add the soft butter and use the electric beater to mix until you have fine crumbs. TA DA!! Add the vanilla essence and now get your hands in there - it may take a little effort to get it to form a dough but once it does it's glorious! Don't panic and add any extra liquid!

Pat out on a floured surface (the original recipe says un-floured board but I found it needs a little encouragement not to stick... I also find that on very hot days the dough needs to go into the fridge for a little to set and makes cutting and moving a bit easier (I'd say no more than 30 min though or else rolling becomes hard) 

Roll out to 5mm or so thick and cut with a cookie cutter. 

Place on clean baking tray (no flour, no spray and cook) and bake for 30 minutes. Watch them though as if you cut small shapes and the cookies are thinner then they'll bake in 20 minutes. You don't really want them to go brown or they start getting really dry - hence the cooler oven.

Store in an airtight container or package in a cute little tin or jar to share.


Wednesday, October 17, 2012

Buttermilk Rusk Recipe

Visits to my hairdresser are always social affairs and more like going for coffee with the girls than the tedious few hours it used to be in an impersonal salon...

I digress. Nicky needed ideas for her son's South African Food day at school (he's a gorgeous grade one). We settled on rusks which means a blog post is necessary! I haven't been avoiding blogging, I've just been very busy living (met a new man, introduced him to salad, planted out a few hundred seedlings, trained for an adventure race, cooked many meals, put all my 'extra' stuff into storage, tidied up my house, ran a few hundred km, cycled a few hundred more, etc.)

We always have rusks in the house (it's one of Ouma's responsibilities to keep her busy - which has become my responsibility as she's not able to do it alone anymore). We have a few recipes we follow but the most popular (all over SA - the little sister travels and 'pays' for her accommodation at friends in boxes of rusks) by far is a recipe I got from a friend's housekeeper about 15 years ago.


Stina's Rusks

1kg Self raising flour
4 cups NuttyWheat flour (whole wheat)
2 cups sugar
10ml Cream of Tartar
10ml Bicarbonate of Soda
2ml Salt
500g butter or margarine
250ml boiling water
500ml Buttermilk

Preheat oven to 180 degrees Celcius. Grease a large, square baking tin.

Mix dry ingredients in a big mixing bowl.

Melt butter in another big bowl. Mix in the buttermilk, rinse the buttermilk carton out with the boiling water and add this water to the mix. Mix wet ingredients into the dry ingredients until thoroughly blended. Put the mixture into your baking tin and bake for 1 hour.

Remove from the tin and once cool enough to handle cut into fingers and arrange on the wire shelves from your oven - the more gaps there are between the rusks the faster they dry. Reduce the oven temperature to 70-100 degrees and return the rusks until they are dry throughout. 

Store in an airtight container once cool.

Variations can include adding pretty much any seeds, raisins, dried fruit, etc.

Dunk in tea or coffee :)

Sunday, September 23, 2012

Catering for a crowd

Spaghetti Bolognaise:
When catering for a crowd and having no idea what time the troops will arrive (teens and race teams seem to be unpredictable like that) it helps to have a meal that isn't fiddly and can stand on the stove until needed. I'm terrible at following recipes when it comes to these things but I'll share how this one looked (it was polished off in one sitting so I think they approved :) )


4 onions, finely chopped
4 cloves of garlic, crushed / chopped
1.5kg Lean beef mince
1kg tomatoes (I had a massive jar of canned tomatoes from the garden but any canned tomatoes will do)
3 pots of tomato paste (this isn't a science!)
1kg carrots, grated
5ml each Thyme, Rosemary, parsley, basil, origanum (I used some of these fresh from the garden - increasing quantity for fresh herbs accordingly...)
10ml sugar
Salt and Pepper to taste
15ml Worcester Sauce
20ml olive oil

Heat oil in a BIG pot and gently fry onions and garlic. Once softened add mince and stir until browned through. Add all the other ingredients - turn down to low once heated through and simmer for 30-45 minutes. Adjust seasoning and serve over spaghetti - the kids love grated cheddar on top but I prefer some parmegano or pecorino for a bit more adult flavour.

I cooked up a kilo of spaghetti for this quantity - I did it in one go but should really have divided it in two batches even though I have pots that are big enough...

This fed 10 adults and 2 sixteen year olds with one single solitary portion making its' way into a tupperware for my lunch today (I had to hide it or I probably would have had to think of another lunch to make...!)


Thursday, September 13, 2012

Spring has Sprung!

I've been a bit quiet when it comes to posting but that's just because I've been so busy cooking, entertaining and finally, GARDENING!!!

I scored a major luck while running through my neighborhood on Monday evening - a building site was chucking out a few hundred plastic plant pots and big seedling trays. I went back to fetch them and it looks like I'm sorted for seed planting for the foreseeable future!!

The garden is starting to take shape: the veggie boxes have been moved to where the trampoline used to be (we've kind of outgrown it in the family...!) and the troughs have been cleaned out ready for strawberry seedlings when they finally become available again. 

I may have cheated a little and bought a few seedlings the other day (they were just sooooo tempting when I went through the nursery I couldn't help myself...)
Comfrey - it's coming up all over the place. I'd previously planted it as green manure
which the chickens got hold of and I thought it was gone so emptied the soil out of the
boxes where it was growing... Needless to say, wherever the soil ended up I've got baby comfrey plants jumping up
and now I'm JUMPING for JOY!

Mint - ready for Summer Mojitos!

Mint and pots of peas

Potato Plants in tyres


New growth on the Rose Bushes

Rosemary ready for Lamb Roasts

How awesome are these seedling trays?! 

Seeds planted and labelled - I can't wait to see the little green faces!

Tomato Seedling - unplanted! They came up where last year's ones were growing!

Cheat seedlings from the nursery :)
Tomato plants in the back box, new Lemon Tree in the pot
and a raspberry plant to grow up the wall.


Thursday, August 23, 2012

Simple Lemon Cordial Labels

I decided my Lemon Cordial needed pretty labels (ok ok, I just wasn't tired and felt like doing something creative) I'm super happy with how these turned out especially since I haven't hauled out the craft supplies in longer than I can remember... It was as easy as printing labels in a cool font onto brown cardboard and then tearing them to size. Punched a hole in the top right corner and threaded a bit of raffia through to attach to the bottles. Viola! 


When life Sends you Lemons...

Easy peasy recipe today although it's so easy I'm not sure it counts as a recipe!

I found these gorgeous Grolsch Beer bottles on their way to a bin in a house that doesn't recycle (I know, right?!?!?) and rescued them... It's taken a couple of weeks but i've managed to make something that's perfect for them - Lemon Cordial. The recipes I have say it will keep for a year but with the sixteen year old in my house I'll be lucky if it lasts until next month!


Basically dissolve sugar in freshly squeezed lemon juice (at a ratio of about 1-1.2kg sugar per litre of juice) by warming it gently until the sugar is disolved. I haven't done much experimentation here but the research i did suggested that the mixture shouldn't reach the boil. In reality the sugar disolved by the time the juice was body temperature - which is when I stopped heating it and bottled in sterile bottles. You can water bath preserve if you're pedantic but I really don't think this is necessary. Having left the cordial for a couple of hours I've decided that next time I am going to strain it before bottling - this version has separated with quite a lot of scummy lemon cells on top... Yes, I can be a silly, annoying perfectionist some days!

The sixteen-year-old did a taste test (tot of syrup and fill the glass with cold water) and gave it a massive thumbs up (in teenager that's a grunt and gulp and then pouring another for those of you who haven't got a teenager in your life...)


Sunday, August 12, 2012

What to do with Onion Marmalade

I managed to recover from the recipe test session sufficiently to actually have an appetite. What a great feeling!

The 16 year old was nagging for a snack so I thought I'd test out some marmalade on him... I put some cheese and onion on rice cakes. I got a grunt and "it's good" which in the world of the teenager is quite the positive reaction!

Saturday night was burger night (again!) and we all had cheese and onion toppings (or bottoms depending on who was assembling!)


Saturday, August 11, 2012

Sumptuous Simple Supper

Living in SA I've been lucky enough to eat crayfish off the braai pretty much each season... I've never tried cooking them any other way but gave it a bash when a friend asked for help in the kitchen department (he'd bought tails for an occasion and wanted to learn how to cook them before trying a big batch)

We served them with seafood mayo from woolies, homemade lemon butter and some coriander pesto.

The reality is all you need to do is pop them in a pot of boiling water for a couple of minutes. I can honestly say it was the yummiest fast meal I've had in a very long time!


Friday, August 10, 2012

Onion Marmalade Recipe

Perfectly sticky and sweet onion marmalade
This is a seriously frustrating post since I tested (and retested and retested) and played around with Onion Marmalade recipe ideas a while ago and then promptly lost the notes in a house move. Just thinking about it has made me feel all worked up :(


Unfortunately it was too long ago to remember what worked best so today I've pretty much started from scratch.

The epic fails were recipes I found online all of which turned out to be more like caramelized onion than anything of a preserve... I eventually resorted to going with what I know about making actual jam and marmalade and got the result I was after (after burning a batch of course!) 
Caramelized Onion (FAIL)
Right recipe but burned and overcooked (EPIC FAIL)
Onion Marmalade


  • 1kg onions (it makes no difference what kind of onions you use - I've tried yellow, brown and red onions and they were all very similar)
  • Lug of Olive oil for frying
  • 1 kg Brown Sugar 
  • 1/2 cup brown vinegar (again, not essential which type of vinegar you use. Balsamic works pretty amazingly too but you end up with a much sweeter marmalade rather than the slightly tangy version with spirit vinegar)
  • 15ml Lemon Juice (this is for pectin rather than flavour)
  • 5ml Sea Salt
Thinly slice onions and fry gently (not brown) in olive oil to soften. This is probably the most important step in the process as once you add the other ingredients the onion won't cook any softer. Once the onions are soft, add sugar, vinegar, lemon juice and salt. Allow the the sugar to dissolve slowly over low heat and then bring to a fast boil. Boil until the mixture turns dark and sticky. I've bottled the marmalade as I would any other jam or preserve - seal in hot, sterilized jars and it will keep for ages (I'm not going to commit to a timeline here but will suffice to say I've just finished a jar form a year ago and it was perfect - pity I had to reinvent the recipe too!)

Serving suggestions:

Serve on top of brie cheese on homemade burgers
Amazing on crackers with pretty much any kind of cheese (strong cheeses are my favourite with the sweetness of the marmalade)


Tuesday, August 7, 2012

Let Them Eat Cake...

I managed to have a birthday come and go without a cake this year and to be honest I feel a little devastated to admit that... I'm not sure this has happened before and I'm pretty certain it shouldn't happen again!

Anyway, to make up for it I made my 'effort' cake yesterday afternoon to go with tea for a special friend :)


Dark Chocolate Tray Cake

500ml Flour
500ml Sugar
pinch of Salt
5ml Bicarbonate of Soda
125g butter (or margarine if you're not a purist)
250ml water
125ml Oil
125ml Cocoa Powder
2 Eggs (I choose big ones from my hens)
125ml buttermilk

Preheat oven to 180 degrees Celcius and grease a large baking tray.
Sift flour, sugar, salt and bicarb into a bowl. Well, that's what the recipe I got says... In reality there's absolutely nothing wrong with dumping the ingredients in a bowl and using a whisk to mix them up whilst adding a little air.
Put the butter, water, oil and cocoa in a microwaveable jug and heat through (basically so the butter melts and they can be mixed). 
While this cools slightly beat the eggs and buttermilk. Now add wet ingredients to dry and mix without killing them! (that's 'Lauren' for "fold in gently")
Pour into the prepared tray and bake for 25minutes. This time is a guideline only - which means you should start testing after 25 min... yesterday's cake took closer to 35minutes before my skewer came out clean. Don't panic, just give it another few minutes at a time!
Cool and ice in the tray.

Mind-blowing chocolate Icing

75g butter
30ml cocoa powder
45ml buttermilk
5ml vanilla essence
375ml icing sugar

Melt butter and then add all the other ingredients and mix until there re no lumps. The original recipe had elaborate instructions but I'm of the view that things should be kept simple unless it's absolutely necessary to make them complicated and in this case it definitely doesn't need to be complicated!
Pour over the partially (or completely) cooled cake.


Sunday, July 15, 2012

It's been a while....

Matilda


So much has happened since my last post and it gets to a point where I feel so overwhelmed about posting I procrastinate indefinitely :( 

Anyway I'll  just pretend that my last post was yesterday and be normal!

I added a new member to the farmyard a week ago - she's wiggled her way into our lives and hearts in record time (think girls and puppies and you'll get the idea!) The only relationship that isn't going to work out is that between Matilda (or Piggity as my mom insist on calling her so as to avoid naming her and dealing with the consequences surrounding the naming of a 'farm' animal.......)


The other thing I've done is ban boring salads. Now by boring salads I mean a typical greek salad (lettuce, tomato, cucumber, etc.). The consequences of this decision have been entertaining :) We've gone from a teenage lad who had to be persuaded to eat fresh greens to one who, if left unsupervised to dish up, cleans the salad platter before anyone else can get a look in...


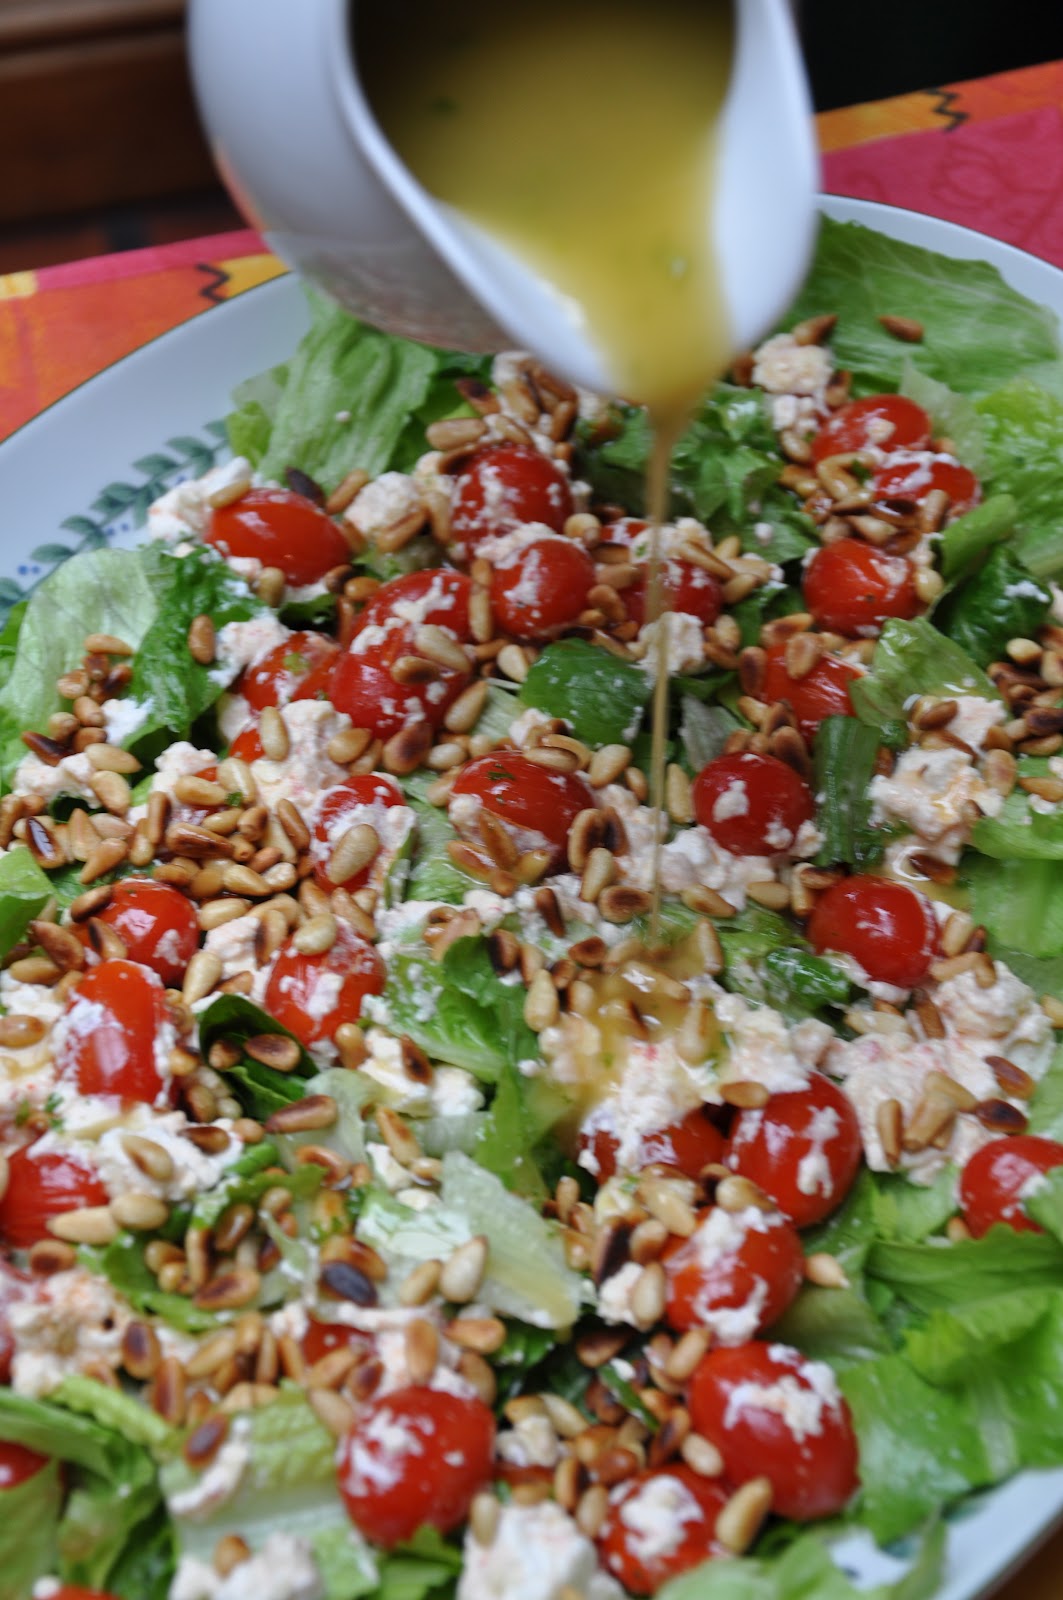
Roasted Tomato and Feta Salad
Today's salad to go with a mid winter braai for mom's birthday - as usual there are many people at this table!


I've got a very simple yet impressively tasty recipe:


Cos and Iceberg Lettuce (I find the mix is way nicer than a single leaf choice)
Rosa Tomatoes
Feta
Pine Nuts (Toasted in a nonstick pan - but don't let them burn or they'll turn bitter)


Cut the lettuce in manageable chunks and spread on a salad platter (not a bowl as this salad doesn't want to be tossed!) Toast the pine nuts in a pan (if the oven is on for something else you can roast them instead). Set aside in a bowl. Put a little olive oil in the pan and toss in the tomatoes - roast them until they're soft but not squishy (experiment with what you like here). Add the feta and stir in to melt a bit. Pour this gooey yumminess over the leaves, sprinkle with pine nuts and dress vinaigrette just before serving. 


Vinaigrette Recipe

50ml vinegar (you can use pretty much any vinegar but the better the vinegar, the better your dressing!)
150ml Olive oil 
1tsp sugar
Fresh parsley (or any herb of your prefeerence)
White pepper
Salt

Mix all the ingredients in a glass jar and allow to stand for an hour for the flavours to develop. Super simple. Super yummy!


Wednesday, February 1, 2012

Gourmet Burger Night!

I'm no big fan of the burger. There, I said it... And now I have to take it back and say I'm the world's biggest little fan of the right burgers! I'll include the recipe just because I'd love everyone to see just how easy it is to make burgers from scratch and you'll be in love too...


Burger Patty Recipe


  • 500g lean mince (Sirloin steak put through a mincer is your very best option but if you haven't got one of these woolworth's lean mince is delish)
  • Handful parsley, finely chopped
  • An onion finely chopped and cooked over a low heat until soft and sweet
  • Egg
  • Bread crumbs
  • Salt and pepper


Mix the ingredients excluding bread crumbs in a large bowl. Add bread crumbs until you have a firm consistency. Weigh off your burgers (small = good in this case!) the size you'd like them and shape into patties. I have a mould that's the right size but I find making a ball and squashing it with my hands is way more fun. Place on a greased tray and put into the fridge for at least an hour to set.


Cook in a marinade of your choice. To serve, lightly toast your buns in an oiled pan, then use a layer of salad leaves under the patty. We love the combination of brie and my homemade onion marmalade with rocket leaves. Give it a try - there's no limit to the toppings you can add!


Tuesday, January 31, 2012

Summer Refreshment

After a long day of running around (the type that make me wish I had a normal day job...) there's not much better than a sugar-free rock shandy :) No so eco-friendly I'm afraid as I have to admit I buy little cans of lemonade and soda... I send them to recycling to justify myself! 


It's so simple as tastes and looks great: equal parts lemonade and soda water, add a couple of ice blocks and then add a dash of bitters... voila! You have a yummy and refreshing drink that makes you feel like it's ok to put your feet up