Visits to my hairdresser are always social affairs and more like going for coffee with the girls than the tedious few hours it used to be in an impersonal salon...
I digress. Nicky needed ideas for her son's South African Food day at school (he's a gorgeous grade one). We settled on rusks which means a blog post is necessary! I haven't been avoiding blogging, I've just been very busy living (met a new man, introduced him to salad, planted out a few hundred seedlings, trained for an adventure race, cooked many meals, put all my 'extra' stuff into storage, tidied up my house, ran a few hundred km, cycled a few hundred more, etc.)
We always have rusks in the house (it's one of Ouma's responsibilities to keep her busy - which has become my responsibility as she's not able to do it alone anymore). We have a few recipes we follow but the most popular (all over SA - the little sister travels and 'pays' for her accommodation at friends in boxes of rusks) by far is a recipe I got from a friend's housekeeper about 15 years ago.
Stina's Rusks
1kg Self raising flour
4 cups NuttyWheat flour (whole wheat)
2 cups sugar
10ml Cream of Tartar
10ml Bicarbonate of Soda
2ml Salt
500g butter or margarine
250ml boiling water
500ml Buttermilk
Preheat oven to 180 degrees Celcius. Grease a large, square baking tin.
Mix dry ingredients in a big mixing bowl.
Melt butter in another big bowl. Mix in the buttermilk, rinse the buttermilk carton out with the boiling water and add this water to the mix. Mix wet ingredients into the dry ingredients until thoroughly blended. Put the mixture into your baking tin and bake for 1 hour.
Remove from the tin and once cool enough to handle cut into fingers and arrange on the wire shelves from your oven - the more gaps there are between the rusks the faster they dry. Reduce the oven temperature to 70-100 degrees and return the rusks until they are dry throughout.
Store in an airtight container once cool.
Variations can include adding pretty much any seeds, raisins, dried fruit, etc.
Dunk in tea or coffee :)
Showing posts with label recipe. Show all posts
Showing posts with label recipe. Show all posts
Wednesday, October 17, 2012
Sunday, September 23, 2012
Catering for a crowd

When catering for a crowd and having no idea what time the troops will arrive (teens and race teams seem to be unpredictable like that) it helps to have a meal that isn't fiddly and can stand on the stove until needed. I'm terrible at following recipes when it comes to these things but I'll share how this one looked (it was polished off in one sitting so I think they approved :) )
4 onions, finely chopped
4 cloves of garlic, crushed / chopped
1.5kg Lean beef mince
1kg tomatoes (I had a massive jar of canned tomatoes from the garden but any canned tomatoes will do)
3 pots of tomato paste (this isn't a science!)
1kg carrots, grated
5ml each Thyme, Rosemary, parsley, basil, origanum (I used some of these fresh from the garden - increasing quantity for fresh herbs accordingly...)
10ml sugar
Salt and Pepper to taste
15ml Worcester Sauce
20ml olive oil
Heat oil in a BIG pot and gently fry onions and garlic. Once softened add mince and stir until browned through. Add all the other ingredients - turn down to low once heated through and simmer for 30-45 minutes. Adjust seasoning and serve over spaghetti - the kids love grated cheddar on top but I prefer some parmegano or pecorino for a bit more adult flavour.
I cooked up a kilo of spaghetti for this quantity - I did it in one go but should really have divided it in two batches even though I have pots that are big enough...
This fed 10 adults and 2 sixteen year olds with one single solitary portion making its' way into a tupperware for my lunch today (I had to hide it or I probably would have had to think of another lunch to make...!)
Thursday, August 23, 2012
When life Sends you Lemons...
 Easy peasy recipe today although it's so easy I'm not sure it counts as a recipe!
I found these gorgeous Grolsch Beer bottles on their way to a bin in a house that doesn't recycle (I know, right?!?!?) and rescued them... It's taken a couple of weeks but i've managed to make something that's perfect for them - Lemon Cordial. The recipes I have say it will keep for a year but with the sixteen year old in my house I'll be lucky if it lasts until next month!

The sixteen-year-old did a taste test (tot of syrup and fill the glass with cold water) and gave it a massive thumbs up (in teenager that's a grunt and gulp and then pouring another for those of you who haven't got a teenager in your life...)


Friday, August 10, 2012
Onion Marmalade Recipe
 |
| Perfectly sticky and sweet onion marmalade |
Unfortunately it was too long ago to remember what worked best so today I've pretty much started from scratch.
The epic fails were recipes I found online all of which turned out to be more like caramelized onion than anything of a preserve... I eventually resorted to going with what I know about making actual jam and marmalade and got the result I was after (after burning a batch of course!)
 |
| Caramelized Onion (FAIL) |
 |
| Right recipe but burned and overcooked (EPIC FAIL) |
- 1kg onions (it makes no difference what kind of onions you use - I've tried yellow, brown and red onions and they were all very similar)
- Lug of Olive oil for frying
- 1 kg Brown Sugar
- 1/2 cup brown vinegar (again, not essential which type of vinegar you use. Balsamic works pretty amazingly too but you end up with a much sweeter marmalade rather than the slightly tangy version with spirit vinegar)
- 15ml Lemon Juice (this is for pectin rather than flavour)
- 5ml Sea Salt
Thinly slice onions and fry gently (not brown) in olive oil to soften. This is probably the most important step in the process as once you add the other ingredients the onion won't cook any softer. Once the onions are soft, add sugar, vinegar, lemon juice and salt. Allow the the sugar to dissolve slowly over low heat and then bring to a fast boil. Boil until the mixture turns dark and sticky. I've bottled the marmalade as I would any other jam or preserve - seal in hot, sterilized jars and it will keep for ages (I'm not going to commit to a timeline here but will suffice to say I've just finished a jar form a year ago and it was perfect - pity I had to reinvent the recipe too!)
Serving suggestions:
Serve on top of brie cheese on homemade burgers
Amazing on crackers with pretty much any kind of cheese (strong cheeses are my favourite with the sweetness of the marmalade)


Tuesday, August 7, 2012
Let Them Eat Cake...
 I managed to have a birthday come and go without a cake this year and to be honest I feel a little devastated to admit that... I'm not sure this has happened before and I'm pretty certain it shouldn't happen again!
Anyway, to make up for it I made my 'effort' cake yesterday afternoon to go with tea for a special friend :)
Dark Chocolate Tray Cake
500ml Flour
500ml Sugar
pinch of Salt
5ml Bicarbonate of Soda
125g butter (or margarine if you're not a purist)
250ml water
125ml Oil
125ml Cocoa Powder
2 Eggs (I choose big ones from my hens)
125ml buttermilk
Preheat oven to 180 degrees Celcius and grease a large baking tray.
Sift flour, sugar, salt and bicarb into a bowl. Well, that's what the recipe I got says... In reality there's absolutely nothing wrong with dumping the ingredients in a bowl and using a whisk to mix them up whilst adding a little air.
Put the butter, water, oil and cocoa in a microwaveable jug and heat through (basically so the butter melts and they can be mixed).
While this cools slightly beat the eggs and buttermilk. Now add wet ingredients to dry and mix without killing them! (that's 'Lauren' for "fold in gently")
Pour into the prepared tray and bake for 25minutes. This time is a guideline only - which means you should start testing after 25 min... yesterday's cake took closer to 35minutes before my skewer came out clean. Don't panic, just give it another few minutes at a time!
Cool and ice in the tray.
Mind-blowing chocolate Icing
75g butter
30ml cocoa powder
45ml buttermilk
5ml vanilla essence
375ml icing sugar
Melt butter and then add all the other ingredients and mix until there re no lumps. The original recipe had elaborate instructions but I'm of the view that things should be kept simple unless it's absolutely necessary to make them complicated and in this case it definitely doesn't need to be complicated!
Pour over the partially (or completely) cooled cake.
Sunday, July 15, 2012
It's been a while....
 |
| Matilda |
So much has happened since my last post and it gets to a point where I feel so overwhelmed about posting I procrastinate indefinitely :(
Anyway I'll just pretend that my last post was yesterday and be normal!

 I added a new member to the farmyard a week ago - she's wiggled her way into our lives and hearts in record time (think girls and puppies and you'll get the idea!) The only relationship that isn't going to work out is that between Matilda (or Piggity as my mom insist on calling her so as to avoid naming her and dealing with the consequences surrounding the naming of a 'farm' animal.......)
The other thing I've done is ban boring salads. Now by boring salads I mean a typical greek salad (lettuce, tomato, cucumber, etc.). The consequences of this decision have been entertaining :) We've gone from a teenage lad who had to be persuaded to eat fresh greens to one who, if left unsupervised to dish up, cleans the salad platter before anyone else can get a look in...
 |
| Roasted Tomato and Feta Salad |
I've got a very simple yet impressively tasty recipe:
Cos and Iceberg Lettuce (I find the mix is way nicer than a single leaf choice)
Rosa Tomatoes
Feta
Pine Nuts (Toasted in a nonstick pan - but don't let them burn or they'll turn bitter)


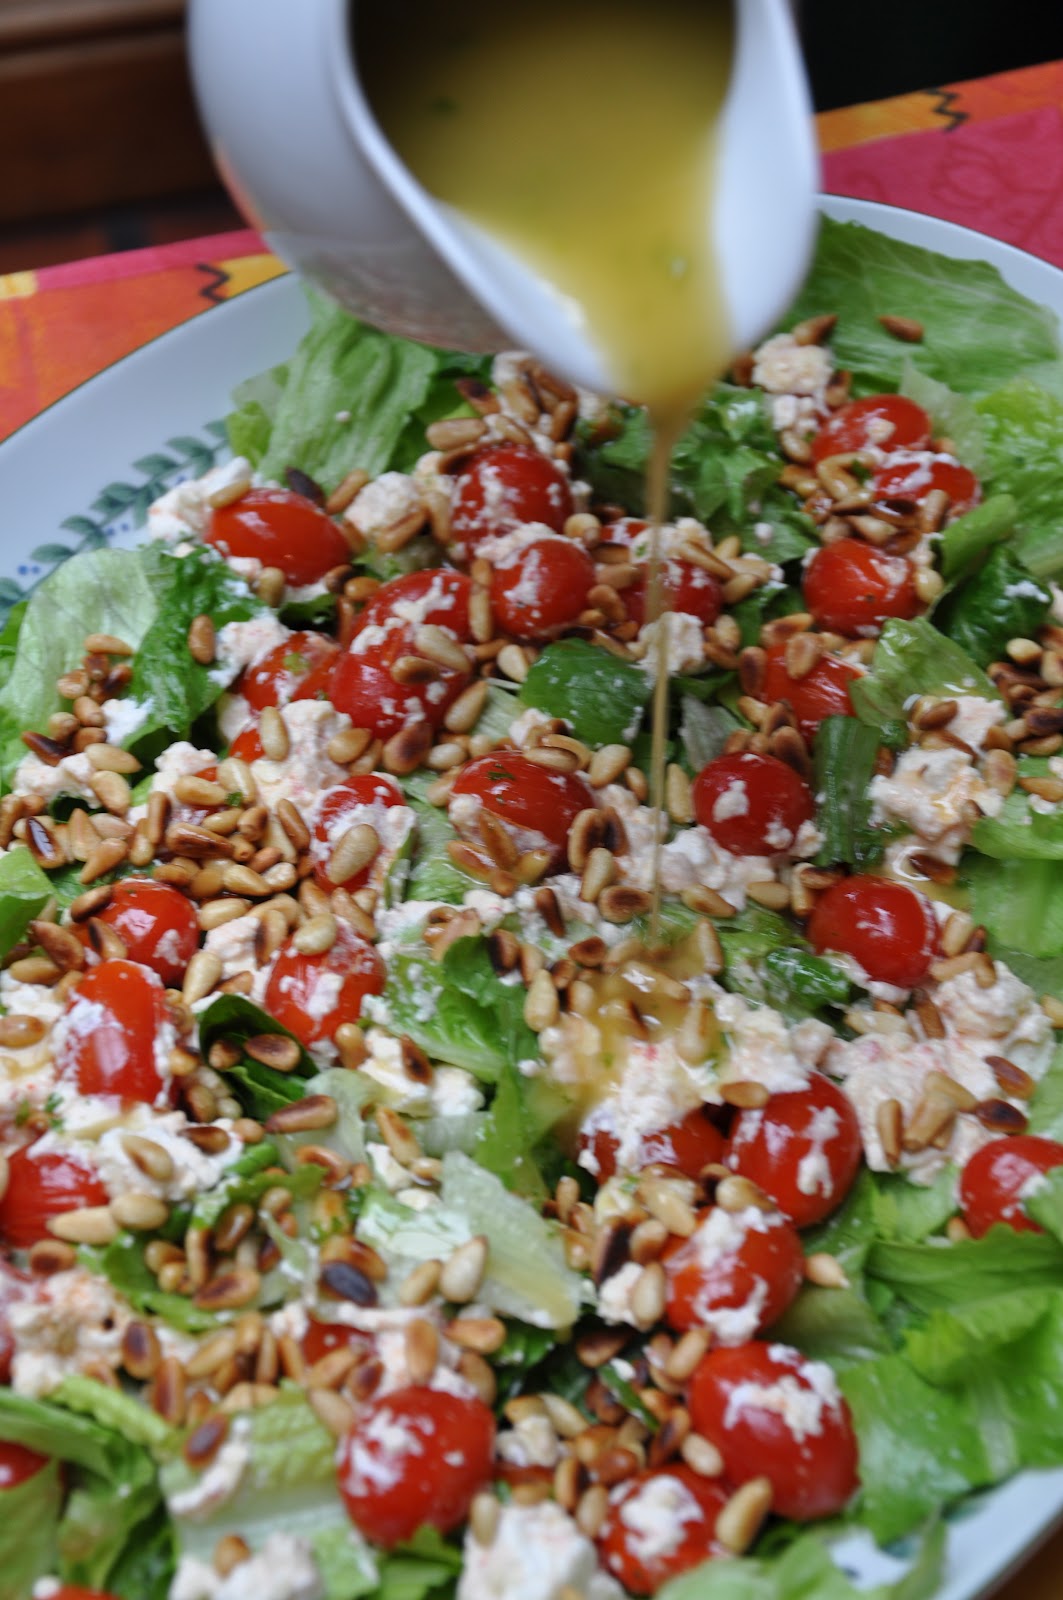 Vinaigrette Recipe
50ml vinegar (you can use pretty much any vinegar but the better the vinegar, the better your dressing!)
150ml Olive oil
1tsp sugar
Fresh parsley (or any herb of your prefeerence)
White pepper
Salt
Mix all the ingredients in a glass jar and allow to stand for an hour for the flavours to develop. Super simple. Super yummy!
Wednesday, February 1, 2012
Gourmet Burger Night!
 I'm no big fan of the burger. There, I said it... And now I have to take it back and say I'm the world's biggest little fan of the right burgers! I'll include the recipe just because I'd love everyone to see just how easy it is to make burgers from scratch and you'll be in love too...
 Burger Patty Recipe
- 500g lean mince (Sirloin steak put through a mincer is your very best option but if you haven't got one of these woolworth's lean mince is delish)
- Handful parsley, finely chopped
- An onion finely chopped and cooked over a low heat until soft and sweet
- Egg
- Bread crumbs
- Salt and pepper
Mix the ingredients excluding bread crumbs in a large bowl. Add bread crumbs until you have a firm consistency. Weigh off your burgers (small = good in this case!) the size you'd like them and shape into patties. I have a mould that's the right size but I find making a ball and squashing it with my hands is way more fun. Place on a greased tray and put into the fridge for at least an hour to set.
Cook in a marinade of your choice. To serve, lightly toast your buns in an oiled pan, then use a layer of salad leaves under the patty. We love the combination of brie and my homemade onion marmalade with rocket leaves. Give it a try - there's no limit to the toppings you can add!
Tuesday, January 31, 2012
Summer Refreshment
 After a long day of running around (the type that make me wish I had a normal day job...) there's not much better than a sugar-free rock shandy :) No so eco-friendly I'm afraid as I have to admit I buy little cans of lemonade and soda... I send them to recycling to justify myself!
 It's so simple as tastes and looks great: equal parts lemonade and soda water, add a couple of ice blocks and then add a dash of bitters... voila! You have a yummy and refreshing drink that makes you feel like it's ok to put your feet up


Friday, January 27, 2012
Jamie Oliver's Lamb Rack Recipe

This is a recipe straight off Jamie Oliver's website... I didn't cut and paste so don't hold me responsible if the wording isn't exactly the same - anyway, as you probably know I'm terrible at following recipes to a T and love to add a bit of a story! This is an amazing meal for entertaining as everything is in one roasting dish in the oven and it tastes so yummy. You can prep up to the point of roasting and then chuck it in the oven when your guests arrive - there's zero mess and timing is taken care of.
 Rack of Lamb
10 Potatoes (I've done it with big potatoes, baby potatoes, sweet potatoes and Mediterranean potatoes and they were all delicious!!)
1 handful cherry tomatoes
6 bone rack of lamb
1 handful kalamata olives
1 small handful garlic cloves (I've forgotten this once or twice and you won't notice the difference!)
Sea Salt and Black Pepper
a few sprigs of rosemary
olive oil
Preheat the oven to 180 degrees C (I have no idea how to do a superscript in blogger!!)
Boil the potatoes in salted water (I've used leftover potatoes a few times - baby ones)
Sear the lamb in a little olive oil to seal and brown - this is imperative! You will thank me when you eat it... Crush the potatoes into the lamb juices and fry a little. Mix in the (pitted) olives, cherry tomatoes, rosemary and seasoning. Transfer into a roasting dish and place the lamb on top. Roast in preheated oven for 40min. Allow to stand for a few minutes before cutting into portions and serving. Jamie says it serves 4 but I'd say you need at least 2 bones per person. I make this size serving for two and there's one portion left over for lunch.


Thursday, January 19, 2012
Foodie Girl's Night-in
It's been ages since the girls have gotten together without the lads - it's funny how we go through stages! Needless to say we drank far too much (really good, I mean amazing) wine and I did a little experimental recipe which was divine (if I may say so myself!)
For starters I made a very simple salad - it's actually my absolute favorite recipe at the moment...
- Cos lettuce
- Iceberg lettuce
- Toasted pine nuts
- Parmegano Shavings
- Greek Dressing
I make up individual bowls for each person (I way prefer this presentation to a bowl on the table) - mixing the leaves and dressing then sprinkling pine nuts and then finally parmegano shavings - VOILA! you have a wow salad in minutes!
Mains:
I have to admit I went big here (blush!) Homemade pasta and a fresh Coriander, basil and chili pesto. The pasta is something I've developed a bit of a reputation for - fresh pasta is just so good it makes me wish I was Italian! I've shared the recipe previously here. I underestimated just how much the airconditioner dried out the air and by the time I tried to put the sheets through the cutter they were far to dry and sort of started to crumble - not quite the angel's hair I'd planned :( I improvised a little and cut the sheets with a knife and it turned into a bit of tagliateli
Coriander, Basil and Chili Pesto
- big bag of fresh coriander from woolies
- 30g basil leaves
- pine nuts
- Chili to taste (I used one)
- Olive oil
Blitz the ingredients in a food processor until smooth. Add olive oil a bit at a time to get the right consistency. The key with any pesto is to allow it to stand for an hour or two to develop flavour before using it.
We've just bought an espresso machine (the kind that actually requires you to read the whole manual!) so for desert we had cappuccino's, dark chocolate and maybe a very special bottle of Rupert and Rothschild red vino :)
Sunday, October 16, 2011
Winter seems to be over let's braai!

My involvement was extensive however - I chose the main ingredients and we assembled them together. I decided on lamb kebabs because I think they just work a million times better than beef. We didn't use a recipe with dried apricots but I absolutely had to add them!
Lamb Kebabs:
500g lamb steak cubes / cubed lamb
8 dried apricots dumped into a bowl of boiling water to rehydrate
1 onion, blanched and cut into chunks
1 red pepper, cut into chunks
My man isn't up for sharing his marinade recipe but I've done these kebabs with a ready made marinade from Woolworths and it's tasted fantastic!
Chicken Kebabs: This is a Jamie Oliver inspired recipe
500g chicken breast fillets
5-6 courgettes, sliced thinly lengthways and blanched to soften slightly
2tsp crushed garlic
1tsp chopped fresh chili
bunch of coriander
small bunch of mint leaves
1 lemon, zested and juiced
Olive oil
Salt and pepper
Cut the chicken into cubes and put into a large bowl. Blitz all the ingredients except chicken (duh!) and courgettes in a food processor but leaving the mixture chunky. Pour over the chicken and mix around to make sure it gets coated. Lace the chicken onto skewers with the courgettes zig zagging through.
Pour the marinade over the kebabs and set aside until you're ready to cook them.
Sunday Caesar Salad
After our great Sunday morning mountain bike ride I was ravenous... My awesome man whipped up this delicious Caesar Salad for us for lunch :) How lucky am I?! The only variation from the norm was the addition of avo which we needed to clear out of the fridge.

Saturday, May 7, 2011
Lamb Shanks (I say no more!)
So this blog post has been inspired by a best friend who asked for the recipe (a long time ago already but reminded me this morning), a man who devours my cooking and a trip to Namibia where no meal is complete without meat or fish…
I spent the morning wandering through Swakopmund, rustling through antique stores and drinking German coffee. Bought some presents for the family – all handmade knickknacks with no African inspiration. I’ve had enough carved soapstone animals and bowls to last a lifetime already! Instead I got my host a print on canvas – it’s set on a rough material background and I fell in love with the texture and subject immediately. Mom got a hand embroidered pashmina that was made by some local empowerment project – it’s grey with colourful flowers mad of neat daisy chain stitches. The rest of the family got pewter bookmarks made by the same project – very simple but cute.
It’s my last night in Namibia – I’ve been here a week and since I’m on holiday I’ve had all the time in the world to make all the yummy food I haven’t got time to make at home with my crazy training schedule and work… The guys have been spoilt with roast chicken, lamb and butternut bredie, chicken kebabs with all the trimmings on the braai, pasta, salads, roasted veggies, seared tuna steaks (the hungry man saw to these!), rusks, fudge, apple pie, pears poached in red wine syrup to mention just a few! Tonight, however, I thought I’d go all out: Lamb Shanks in red wine and honey served on crushed potato with veggies on the side (I’ve been spoiling them rotten but every meal has included a green and orange veggie – much to their disgust! Apparently veggies are for moms or girls… I love veg so maybe they’re right!) I’ve got pears left over from the last batch I did so I’ll poach some more of those in red wine but add a spicy twist with cloves tonight I think. I normally serve these with Bulgarian yogurt but tonight I feel like ice cream so that’s what it’ll be.
Lamb Shanks:
In Cape Town this is a real luxury as it’s so expensive to make which is partly why I left it to the last night’s treat dinner. I was pleasantly surprised however when I got to the till at the butchery that lamb in Namibia is just over half the price as it is in SA – big smiles all round! This is a rough guideline as you can’t really mess up this dish. It wants to be yummy all on it’s own!
1 Lamb Shank per person
750ml Red wine - I’m using about a bottle full (there are two open bottles left over from the weekend and these minus the glass I’ll drink while I’m cooking equal about a bottle!). You basically want to almost cover the shanks.
75ml Honey
Rosemary (fresh if you have access to it – it just tastes that much better!)
Mixed dried herbs
Salt and Pepper to season
Heat a little olive oil in a saucepan and brown the lamb on all sides. This locks in flavour and also develops a fuller flavour somehow… Season the lamb with salt and pepper at this point as you transfer it to an appropriately sized casserole dish. Add the red wine, honey and herbs to the casserole before covering securely and putting into the oven at 160oC for an hour and a bit (this is a guideline – the more lamb you have touching the longer it will need to cook for. Should you need to cook it faster you can consider using a separate casserole for each shank – this sounds crazy but I’ve seen it done in those foil baking containers and it worked a dream). Once you’re satisfied that the lamb is cooked through, remove from the oven and allow to rest for at least 15 minutes before serving. If your gravy needs thickening, remove the shanks to a dish and add a little maizena to water before adding to your gravy. Cook over medium heat, stirring constantly to avoid lumps.
Serve with potatoes – mashed, crushed, baked, it doesn’t really matter – and a green veg. I also put mint sauce or jelly on the side as no lamb is complete without it in my books.
A word of warning though: Lamb Shanks are highly addictive… family and friends have been known to be rather a pain after I’ve made shanks for them – they beg for me to make them again and again! They are, however, a really good wow-factor meal if you’re looking to impress… Enjoy!
Thursday, March 3, 2011
Tannie Esme's chocolate cake recipe
I was first introduced to this delicious cake recipe as a kid, a friend's mom used to make it when we played tennis tournaments... Mom, being mom, made sure we got the recipe and it couldn't be simpler! The best part? it can be frozen and defrosted and iced whenever you're ready! Needless to say this little feature comes in very handy when you have to provide snacks for tennis league every second Saturday...
Esme's Chocolate Cake
750ml Cake Flour
80ml Cocoa
20ml Baking Powder
5ml Bicarb
500ml sugar
pinch of salt
500ml boiling water (I let it cool slightly)
250ml oil (measure this first then the hot water takes the oil out of my measuring cup...)
50ml white vinegar (I have substituted this with whatever vinegar is available many times and haven't been disappointed with the results!)
Mix dry ingredients with a whisk (this is a little trick I learned - it does pretty much the same thing as sifting the dry ingredients as it gets air into the mixture). Add wet ingredients. Mix well.
Pour into a tray pan (I use a glass Pyrex baking dish 15x30cm or so and then serve the cake in the pan)
Bake for 25-30min at 180*C
Ice once cool.
This is a very basic chocolate cake. I jazz it up a little with a really good icing... Any icing will work but this is really special and so easy to make (the ingredients are the silly part)
Dark Chocolate Icing
75g Butter
30ml Cocoa Powder
45ml Buttermilk
5ml Vanilla essence
200g (375ml) icing sugar
Melt the butter and stir in sifted cocoa powder (make sure it's not lumpy!). Stir in buttermilk and vanilla. Sift in icing sugar and mix well. Pour over a partially cooled cake. Allow to set before cutting.
Tuesday, February 8, 2011
Best Berry Jam

Over December I visited a berry farm in Swellendam (gorgeous place!) and bought a bunch of frozen berries... I didn't even think of making jam until I got back to Cape Town a week later - usually frozen berries get eaten in minutes but somehow these ones managed to escape!
I didn't have a recipe but stuck to the basics. Here goes:

Mixed Berry Jam Recipe
500g blueberries
500g raspberries
1kg youngberries
6 granny smith apples, grated
15ml lemon juice
2kg sugar
The method is quite simple. Place all the ingredients in a very large heavy bottomed pot over low heat. At the same time, place a saucer in the freezer for testing the jam to see if it's done. Once the sugar is dissolved in the berry juice, bring the mixture to a rolling boil. Stir constantly - the jam will bubble up to about double the original volume and could boil over if you're not careful. Once the colour of the jam has changed and it's looking like runny jam (15-20min) test a little on your chilled saucer - I made notes on testing jam with my strawberry jam recipe.
Bottle in sterilized, hot jars. I close the jars whilst still hot to ensure that they seal properly and have stored jam for over a year without a hitch (mostly, however, the jam only lasts a few weeks before it is devoured by friends and my hungry family)
Monday, November 22, 2010
Creative Pasta
So, after the longest of creative droughts I am finally writing about something yummy AND meaningful once again :-)

The pictures were taken on my new toy: a Nikon D90 which has made me ecstatically happy and takes the most amazing pictures. Unfortunately the pics were taken my an over-zealous fourteen year old who is only starting to learn about composition and the like (you understand when you see them)
Fresh pasta is something that happens often in our house. I've got it to such a fine art that I can make, roll and boil it in under 45 minutes! I haven't had a wedding so I can put a KitchenAid KSM150PSWH Artisan Series 5-Quart Mixer, White on the registry list so the dough still has to be mixed and kneaded by hand (the fourteen year old is really good at this part so we share the duty when he's feeling cooperative) I bought the pasta roller when I did a pasta making course a few years back but it's only started being used regularly since we got the chickens ;-)
The recipe is very simple:
100g flour per egg - use 1 egg per person (I always make extra as there are ALWAYS unexpected guests and if it doesn't get finished on the day it makes for the best lunch or freezer meal) Mix the two together and knead into a dough. If it's too hard, add another egg or water and if it's too sticky then add a little more flour. I divide the dough into manageable balls to knead and roll out or else it's a real challenge...
This time around I decided on Raviolli with butternut and Ricotta and another with spinach and feta.


The pictures were taken on my new toy: a Nikon D90 which has made me ecstatically happy and takes the most amazing pictures. Unfortunately the pics were taken my an over-zealous fourteen year old who is only starting to learn about composition and the like (you understand when you see them)
Fresh pasta is something that happens often in our house. I've got it to such a fine art that I can make, roll and boil it in under 45 minutes! I haven't had a wedding so I can put a KitchenAid KSM150PSWH Artisan Series 5-Quart Mixer, White
The recipe is very simple:
100g flour per egg - use 1 egg per person (I always make extra as there are ALWAYS unexpected guests and if it doesn't get finished on the day it makes for the best lunch or freezer meal) Mix the two together and knead into a dough. If it's too hard, add another egg or water and if it's too sticky then add a little more flour. I divide the dough into manageable balls to knead and roll out or else it's a real challenge...
This time around I decided on Raviolli with butternut and Ricotta and another with spinach and feta.


Sunday, September 19, 2010
Strawberry Jam Recipe

It seems to be a kitchen weekend :-) Went to get braai supplies at P'nP just now and found strawberries at a price that made it reasonable enough to make some jam... and, like they say, let's make hay while the sun shines! It's one of the easiest things to make that create a real WOW factor - home-made jam on scones, fresh bread, etc just can't be beaten!

Stawberry Jam:
1kg strawberries
1kg sugar
1 apple, grated
1/4 cup lemon juice
- Big saucepan
- Wooden spoon with a long handle (this is very important as the jam spits unbelieveably hot bubbles which stick to your skin when they come in contact... watch out for your face over the pot too!)
- Sterilised Jam jars
Clean and quarter the strawberries. Put all the ingredients in the pot over a low heat. Simmer until the sugar has completely dissolved. Bring to the boil stirring constantly. Cook the jam until it reaches wrinkle stage (put a saucer in the freezer when you start the process. When you think the jam is ready, put a little on the ice-cold saucer. if you can pull your finger through the mixture without the jam running back together, your jam is done. The surface of the jam wrinkles as you pull your finger through it.)
Bottle the jam in hot, sterilised jars. Clean the rims of the jar with a clean cloth before putting the lids on loosely whilst still very hot. Makes 6 X 230ml jars.


Subscribe to:
Posts (Atom)